
FlexTraining Management Guide

The FlexTraining Total E-Learning Solution
Management Guide
Version 6.1
Copyright 1998 - 2010 National Training Systems, Inc.
Courses Menu
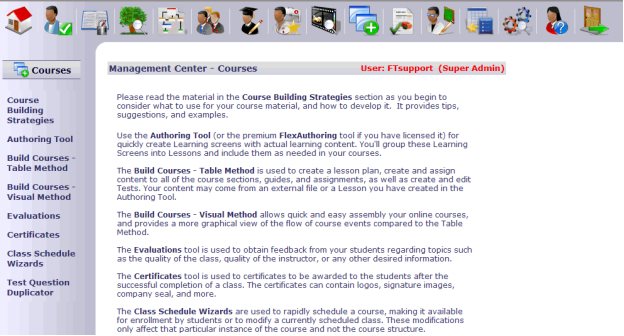
Course Building Strategies
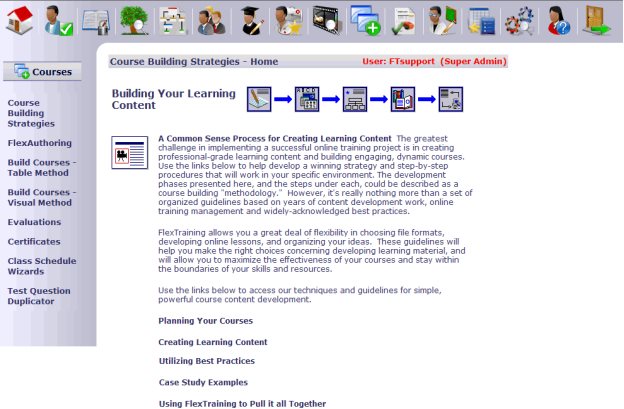
Building Your Learning Content
Your successful online training project should include a course building “methodology,” which is a set of organized guidelines based on years of content development, online training management and widely-acknowledged best practices.
The following guidelines will assist you in choosing file formats, developing online lessons and organizing your ideas.
Planning Your Courses
This section will enable you to determine the scope of your training, organize your material into courses, lay out a course structure for each course and choose a testing strategy and policies.
Create Learning Content
The Learning Content Phase discusses understanding file formats, subject matter in relation to format, keeping it simple, plus shared and re-usable images. Also, multimedia content, software, documentation and forms training, soft skills and streamlined video production.
Utilizing Best Practices
These steps reference the FlexTraining Management Guides, the FlexTraining Authoring Tools, interactivity that reinforces learning, narration adding life to learning content, smart choices for video, choosing images and multimedia and considering a pilot approach.
Case Studies
These studies outline four scenarios: 1) software training and screen captures, 2) soft skills and video clips, 3) safety training, simple text and images, and 4) technical training and extremely tight deadlines.
Using FlexTraining
This section helps you put your courses together by discussing the importance of library materials and flexibility in assembling learning screens and courses.
FlexAuthoring/Authoring Tool
In the normal flow of the work involved, if you are planning to use FlexAuthoring to create your course content, you would do so before using the Course Builder tools (table method or visual method) to assemble the course sections and tests.
If you plan to build your courses entirely from external files, such as PowerPoint, Word, PDF, Flash or Video files, you do not need to use FlexAuthoring. In that case, you should move on to the next section of this guide.
Please note that this section of the Management Guide is a very abbreviated explanation of the FlexAuthoring Tool. There is 100+ page FlexAuthoring Guide available that goes over this tool in more detail.
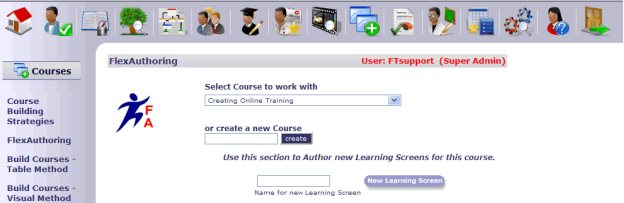
From the Courses Menu, select “FlexAuthoring” or “Authoring Tool.” If you have not licensed the FlexAuthoring premium authoring tool, you will see the term “Authoring Tool” in places that would otherwise say “FlexAuthoring.” Sometimes these terms are used interchangeably in this guide.

Start by choosing an existing course, or enter a Course Title to create a new course. (You may have some courses in your system that use content created with FlexAuthoring and some that do not.)
FlexAuthoring will then display any Lessons and Learning Screens that you have already built for this course.
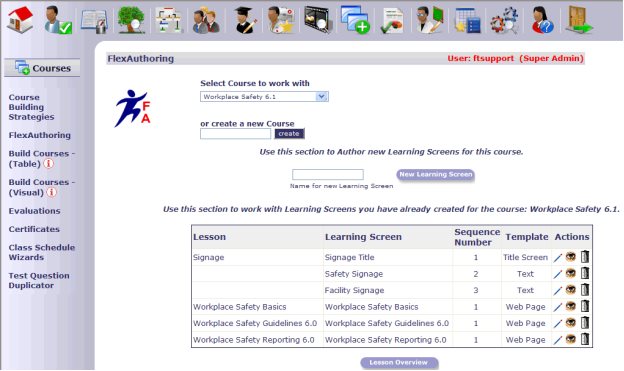
Pages that you have created using the FlexTraining Authoring Tool are called Learning Screens. At the top of the page is where you begin to create a new Learning Screen. Just enter in the name of the Learning Screen that you would like to create and click on the “New Learning Screen” button.
The bottom portion of the screen is for editing, previewing or deleting screens you have already authored. If you have already created Learning Screens for this course, they will display in this section of the page. If there are no screens yet authored for this course, then obviously no list will appear. The list of screens can be sorted by Lesson Name, Learning Screen Name, Sequence Number or Template type simply by clicking on the underlined column heading.
The Lesson Name column has a “Click to Preview” link. Click on the link to view the full lesson preview in a pop-up window.
The Actions column has three image buttons. Click on the pencil to edit that Learning Screen. Click on the Eye to view a live preview of the page exactly as the student would see it. Click on the Trashcan to delete that screen from your course. Be careful, as deleting a screen cannot be undone.
Authoring a New Screen
To create (author) a new screen, you will first enter a name for your new Learning Screen, and then define the various elements of the screen:
- Title, text, font, layout, background image, body image.
- Optional Learner Exercise questions, answers, and answer messages.
- Screen text and background colors, interaction colors.
- Lesson names and Lesson order.
Start by entering a name and clicking the “New Learning Screen” button.
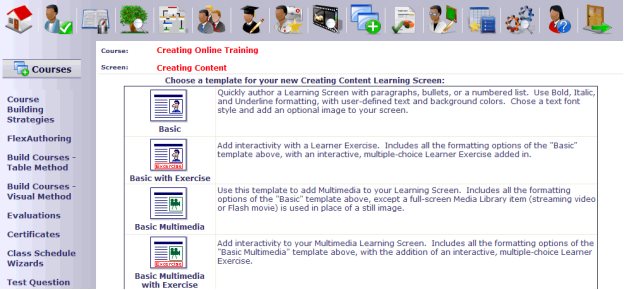
The next screen will contain a list of template styles. Choose which type of screen you would like to author. Available template styles are Basic text, Basic text with an interactive Learner Exercise, Basic Multimedia and Basic Multimedia with a Learner Exercise. For this example, we have chosen a Basic screen.
Define Section
Once you choose a template, your next steps are in the Define Screen Elements of the Authoring Tool. In the Define section, you give the new screen a title, an optional image, set your text and background colors, as well as optional sounds, navigation bar and auto-advance features.
The top left of the top frame displays the name of the screen you are working on and the name of the course it belongs to.
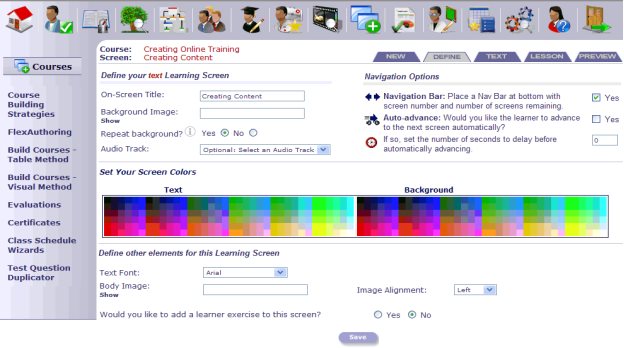
Enter On-Screen Title
Enter a title to appear at the top of the screen.
Select Background Image
You may identify an image file to appear as a screen background when the authored screen is presented to the learner. Adding a Background Image is optional. To browse for a list of images in the AT_Items/Backgrounds/ folder, click on the “Show” button. This will bring up a window that allows you to preview and select a background image.
Select Repeat Background
Select “Yes” if you want the background image to be tiled on the screen, or “No” to display the background image only once.
Choose Audio Track
In this section, you can add a streaming audio track that you created and added to the Media Library. Select the audio file from the pull down menu.
Navigation Options
The first option is the Navigation Bar. When enabled, the current screen will have a section at the bottom of the screen that includes the screen number, advance and back buttons and a reload button for refreshing the page and listening to the audio track over again.
The second option is the Auto Advance option. If this is enabled, the screen will automatically jump to the next page in the lesson after a defined number of seconds.
Set Your Screen Colors
This section allows you to set colors for:
- Screen body text and background colors
- Learner Exercise (Question and Answer) text and background colors
Simply click on the color you wish to use for your text and the color you wish to use for your background. You will see the text color of this section change to correspond with your choices. Please note that if you use a background image, the background color will only show in the Learner Screen.
Define other elements of this Learning Screen
Choose Text Font
Choose the font to be used for all text on your authored screen.
Select Body Image
You may specify an image file name (file must reside in the asp/content/sections/images directory) for an image to appear in the screen body.
Adding a Body Image is optional. To browse for a list of images in the AT_Items folder, click on the “Show” button. This will bring up a window that allows you to preview and select a body image.
Select Image Alignment
If you entered the filename for a Body Image above, specify whether it will be centered, left or right aligned, compared to the text around it.
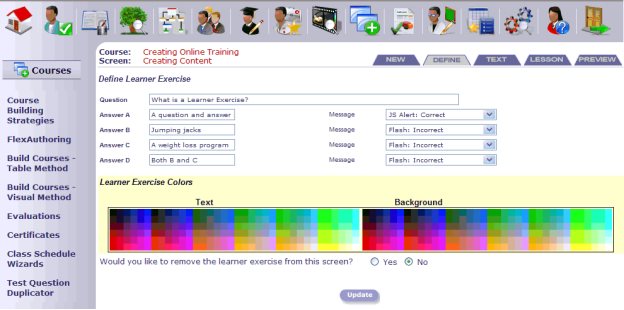
Add Learner Exercise
You have the option to add a Learner Exercise to the screen. The Learner Exercise, or Question and Answer section, appears below as it might look after you entered a question, typed four sample answers, and selected a response message for each.

When creating the Learner Exercise, the message options that appear in the pull-down lists to the right of the answer are the Dynamic Messages that were created in the Media Library. In addition, FlexTraining ships with a few pre-built messages to illustrate how this feature can be used.
You can select any message as a response to any chosen answer. Typically you would use messages that indicated the learner chose the wrong answer for each of your candidate answers except the right one. In the screen shot below, you can see that a JavaScript message is being used to indicate incorrect choices, while a small Flash Movie will play when the correct answer is chosen.
If you create your own Flash Movies and Dynamic Messages, make sure and give each a short but meaningful description that will indicate its purpose. This description will show in the message list. It is much easier to use the Dynamic Messages feature if you have described them carefully.
Save
Once you have made all of your selections, scroll to the bottom of the screen and click “Save.” It is important that you save your screen after any changes are made. You can always go back and make changes at a later time. When you have finished making changes to this page, remember to click the “Update” button before moving to the next tab. If you do not, your changes/additions will not be saved and you will need to enter them again.
Text Editor
Next, click on the Text tab on the top menu. The frame will display the form you will use to add text to your screen. (if all the tools do not display, click on the Text tab one more time, and they should appear)
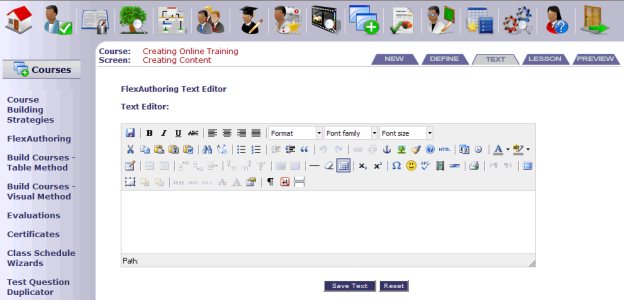
Text Editing Tools
The text edit function allows expanded text editing capabilities, including comprehensive font manipulation and sizing, text alignment and select highlighting. You can add text to the screen and customize the font, plus you can insert a hyperlink, insert a text image, insert an Email, align text to the left, right or center and create a bullet point list.
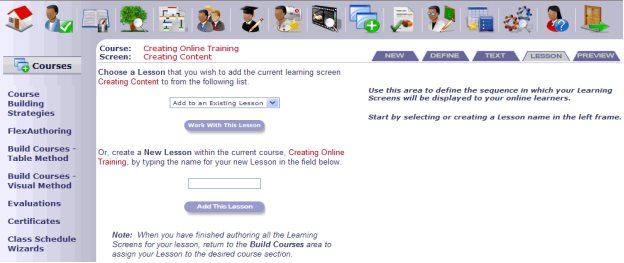
Lesson Section
The purpose of the Lesson Section is to group your screens into sub-lessons and to arrange the files in a viewing order. Select a lesson from the pull-down list and press the “Work With This Lesson” button to organize your screens in that lesson. You can also create a new lesson group by typing a new lesson name in the bottom left text box and clicking the “Add This Lesson” button.
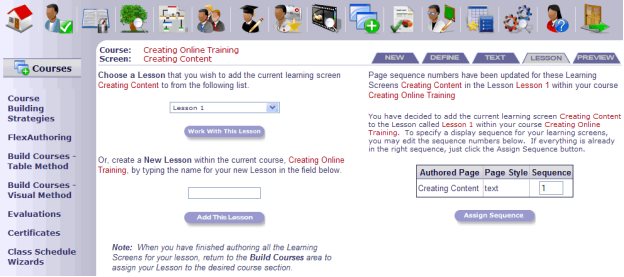
Once you have selected or created the lesson, you may change the display order of the screens by editing the numbers in the boxes next to each screen. Assign a sequence number to the screen and click the “Assign Sequence” button to update the page order. The numbers may range from 1 to 9999 with the lowest numbers being displayed first and the higher numbers displayed last.
Concept: Linking authored screens together
The FlexTraining Authoring Tool allows you to link any authored screen to any other authored screen within a given course. This freedom to link screens together leads to a question: What is the best way to link content together?
The best way is to divide your authored screens into logical groups, based on subject matter, and define a natural sequence for each group. FlexTraining will automatically add a “Continue” button to the bottom of any authored screen when the auto-advance feature is off and the navigation bar feature is off.
You could decide to link every single screen you create into one long
Lesson, and in some cases that may be appropriate. As the course designer, that’s up to you.
You might also decide that for your material, you do not want to link any screens together, and therefore, every screen will “stand alone.”
Use the “Lesson Overview” button on the Authoring Tools page list screen to see a high-level view of the screens you have created. The overview will show you how you have linked your screens together. You can make changes at any time.
Preview Section
Clicking the Preview tab displays the screen, as it has been defined up to the current moment, in the bottom frame. The navigation bar will be visible but inactive.
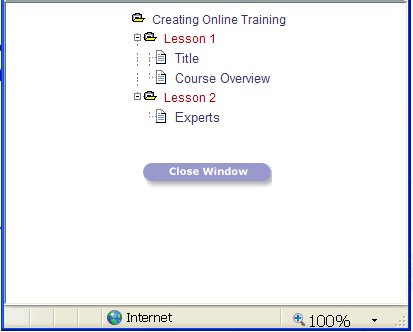
Lesson Overview
The “Lesson Overview” button presents an overview of all the pages you have authored for the current course and depicts their relationships as you have defined them.
Pages are arranged in a collapsible outline, according to how you have defined their linkages. Each “cluster” contains all the pages in a group that are linked together.
Concept: Where do my pages go?
Most of the material that makes up your authored pages resides in the FlexTraining database, so do not look for lots of new HTML pages on your web server when you finish some authoring work.
The exceptions are any images you use in your authored pages (that you created outside of FlexTraining, and that reside in the asp/content/sections/images directory).
Keeping the authored page content in the database keeps your directory structure simple and avoids the proliferation of files and documents that is the hallmark of external authoring software.
Other exceptions are the multimedia (streaming audio and video) files that occupy the pages you identify as multimedia pages. These files MUST have already been defined as dynamic messages (see Dynamic Messages section above) before they may be used in an authored page.
Defining a “message” to hold these multimedia files or addresses makes these objects re-usable and it is easier to keep track of them.
Copy Screens to Another Course
After you have created and defined your learning screens, you may copy them from one FlexTraining course to another FlexTraining course. Select a destination course and the “Continue” button. The screens are automatically entered into the designated course.
Using your Authored Lessons
Authored training pages are not the same as Course Content Sections, since one Content Section can contain many authored pages. A collection of Learning Screens is organized into a Lesson, as described above.
After you have authored some, or all, of the screens and Lessons for your course, you may sequence them into your course using the Table Method or Visual Method, which are described below. When that happens, an authored Lesson becomes a Course Section.
A Course Section may have many learning screens in it if you have linked several screens into a large Lesson. Or, you may decide to have a Course Section with only a single authored screen.
Build Courses – Table Method
The table method uses a table layout to display courses and allows you to add and edit course Lesson Plans. Building a course with the table method creates the same data as the visual method (see “Build Courses – Visual Method”), only the screens and techniques are different. The end result is the same – a complete course ready to schedule.
The first step in defining a FlexTraining course is to build a lesson plan. A lesson plan is a high-level course definition, with all the parameters that distinguish one course from another. You will use the lesson plan as the basis for all the course content items that follow.
When you use the table method, you tell FlexTraining how many sections, tests, course guide chapters and assignments you will have in your course. Then you use the on-screen table to assemble the actual “pieces” that make up the course.
This screen lets you edit an existing lesson plan, add a new one or delete one that is no longer in use. In order to delete a lesson plan, you MUST enter a password. The password is the password that was used to log into the mgmt center. This password provides added security, since the delete feature can, and will, have a large impact on your data – all training data from that course is deleted.
Please use this option carefully, and backup your database before deleting any lesson plans. Deleting a course is irreversible.
Create a New Course
To create a new course lesson plan, start by clicking on the Create Course icon, which looks like ![]() .
.
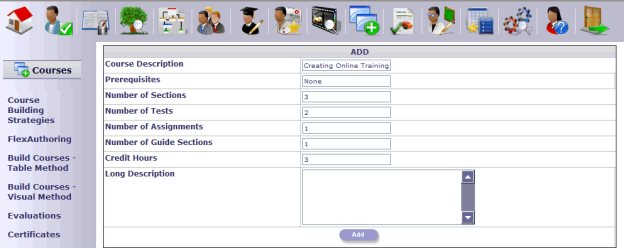
A lesson plan is also known as a Course Definition. The values you may set are as follows:
Create Course Description
Give each course a unique title. This title will appear on various screens when an administrator, student or instructor is working in a course.
Enter Number of Prerequisites
There may be other courses you want each student to successfully complete before being allowed to enroll in this course. If so, enter the course numbers for those courses, separated by commas, in this space. If you do not wish to use prerequisites, leave this field blank. Do not enter course names in this field, only course numbers.
Enter Number of Sections
You must have at least one section. This number represents the number of sections of course material that the course will include. Each section will require a separate HTML page, document, authored lesson or URL address.
Enter Number of Tests
Enter the number of tests that will be defined for this course. This does not have to be the same as the number of sections. Set to “1” or higher.
Enter Number of Assignments
This is the number of assignments that will be defined for this course. It does not have to be the same as the number of sections or tests. This may be set to “0” if you do not want to have assignments. Assignments should not be used if there is no instructor assigned to the course.
Enter Number of Sections
You must have at least one section. This number represents the number of sections of course material that the course will include. Each section will require a separate HTML page, document, authored lesson or URL address.
Number of Credit Hours
This is the number of credit hours that may be earned for this course. This may be set to “0” if you are not offering credit hours.
Enter Long Description
Create a full description of the Class that will be used for keyword searches in the Student Module. The description will display in a pop-up when the “Info” icon is selected in the Student Module course finder.
Copy a Course
You may decide you want to build a course that is similar to another course you have already created. This feature lets you create a course using an existing course as a template.
On the Lesson Plan Builder screen you will see a “Copy” icon – which looks like ![]() - beside each existing lesson plan. This icon initiates a course duplication feature that can create a complete copy of an existing course, and optionally copy over the course components (sections, tests, etc.), as well.
- beside each existing lesson plan. This icon initiates a course duplication feature that can create a complete copy of an existing course, and optionally copy over the course components (sections, tests, etc.), as well.
Clicking on the ![]() icon brings up a form like the following:
icon brings up a form like the following:
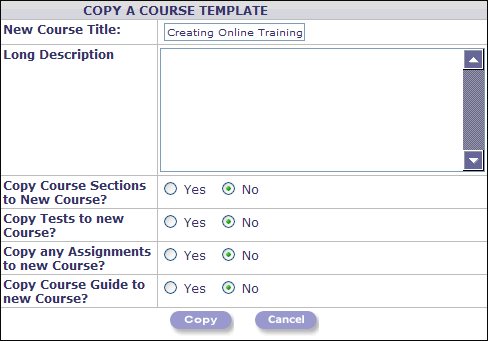
Create Course Title
Enter a unique title for your new course at the top. This title will appear on various screens when an administrator, student or instructor is working in a course.
Enter Long Description
Create a full description of the Class that will be used for keyword searches in the Student Module. The description will display in a pop-up when the “Info” icon is selected in the Student Module course finder.
Copy Course Sections to New Course
Decide whether you want to copy the actual pieces (content sections, course guide chapters, assignments and tests) from the existing course to the new course. If you copy all the “pieces,” the new course is all set and ready to schedule.
If you choose not to copy content and tests, the new “shell” lesson plan will be set up with the same number of each item (content sections, course guide chapters, assignments and tests) as the course you copied from.
Copy Tests to New Course
Decide whether you want to copy the tests from the existing course to the new course.
Copy Any Assignments to New Course
Decide whether you want to copy any assignments from the existing course to the new course.
Copy Course Guide to New Course
Decide whether you want to copy any course guides from the existing course to the new course.
You may edit the new lesson plan (Course Definition) afterward to change any part of the lesson plan structure. You may also make changes to any part of the content, just as with any course. Click the “Copy” button to copy the course.
Edit a Course
To edit the structure of any course (for example, you may decide that the course should have 8 sections instead of 6, or 3 tests instead of 2), simply click on the ![]() icon below the course name. You may modify all the parameters that were entered when you created the course, as listed above.
icon below the course name. You may modify all the parameters that were entered when you created the course, as listed above.
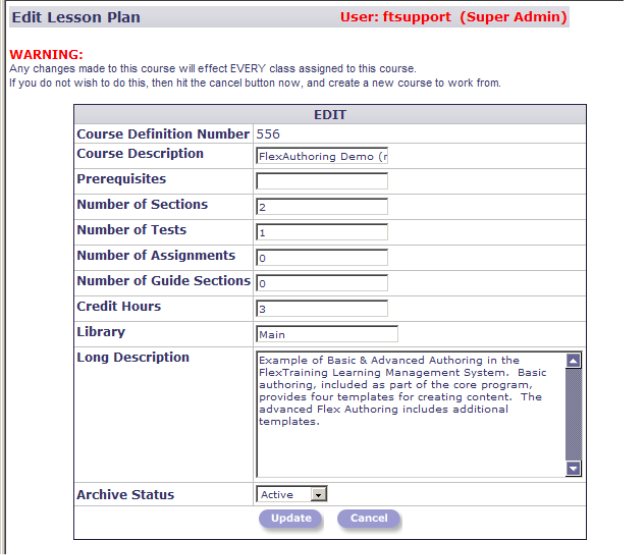
You can also use the Edit screen to “Archive” the course. This action changes the selected course, and all sections and lessons included in the course, to “Archived” status. The course is removed from all of the pull down lists in the system, including Reporting. You can view a list of all “Archived” courses in the Table Method by using the Active/Archive Status pull down menu filter.
All archived courses can be resurrected, if needed. Simply select “Show Archived Courses” from the Status pull down list, find the course and click on the ![]() icon below the course name to change the status to “Active.”
icon below the course name to change the status to “Active.”
Scheduling a Course
To schedule your course from the table method screen, simply click on the schedule icon ( ![]() ) below a course name. For details concerning options you can set when scheduling a course, see the section labeled “Class Schedule Wizards” later in this guide.
) below a course name. For details concerning options you can set when scheduling a course, see the section labeled “Class Schedule Wizards” later in this guide.
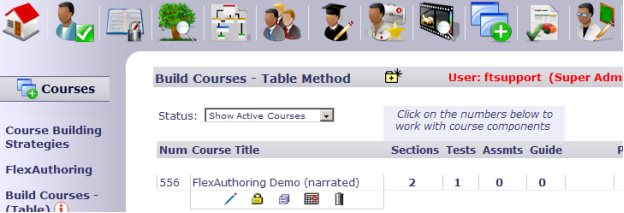
Adding/Changing Course Components
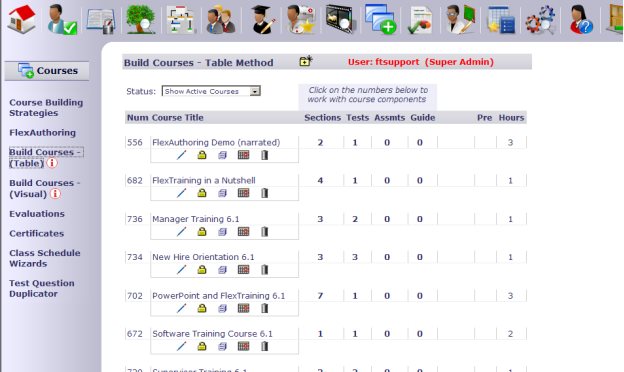
You will want to work with individual course components to define the content of your course. For example, once you tell FlexTraining that your course will have five sections, you will want to define exactly where the content for those five sections comes from. Also, if your course will have two tests, you will need to specify what the questions and answers are for each test.
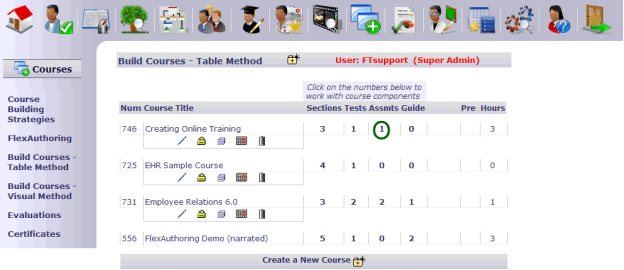
To work with course components, simply click on the number displayed in that column for your course:
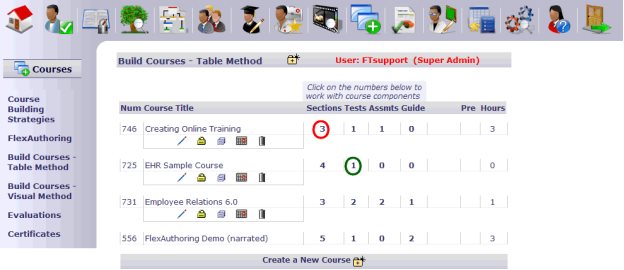
In the example above, to work with the content sections for the course called “Creating Online Training,” you would click on the “3,” which is circled in red here. Or, if you wanted to set testing options and define questions and answers for the one test in the Course “EHR Sample Course,” you would click on the “1” in the Tests column beside that course, which is circled in green here.
Concept: Course Sections and Formats
Before you build the actual Course Content sections, consider your audience. Consider how they are connected to your server and what kinds of helper technology they have included with their web browsers.
If everyone has a high-speed connection to your server, then large graphic, audio or video content may be appropriate. If, however, the students will connect through modems over the public Internet, perhaps simple HTML pages or content authored in FlexTraining should be used for course material.
Also, what kind of file formats are your students set up to handle? If they do not have Audio Player plug-ins installed with their web browsers, they will not be able to hear your audio content no matter how fast it loads. The same goes for video files and animation technology such as Macromedia’s ShockWave.
The simplest course content for a web browser to handle is basic HTML, which you can build with any HTML editor, such as Front Page, DreamWeaver or even Microsoft Word.
Working with Content Sections
You should identify or build your course content pages or documents, or build screens and lessons in FlexAuthoring, before continuing. These pages or documents may be on your server, or anywhere on the Internet or your Intranet.
You access the Content Sections tools from the “Build Courses – Table Method” screen. When you click on the number that represents the number of sections for a given course, the content builder frameset will open up.
The bottom frame provides details for the sections that have already been defined. These details include the Title, the Location and filename, and the Type of content that make up each course section.
Begin by choosing a Course Section from the list in the upper-right frame.
The list of Sections will start out empty before you have defined any section content. Each entry will say “CREATE CONTENT FOR THIS SECTION.” The number of entries in the list will be the number of Course Sections you defined in your lesson plan for this course.

As you define course section titles and content, the titles will be filled in for the various sections in the list. You are finished when there are no more “CREATE CONTENT FOR THIS SECTION” entries in the pull-down list in the upper-right frame.

Defining Each Course Section
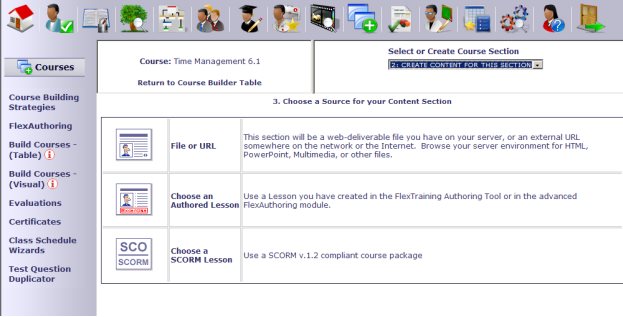
Once you have selected a Section to add, the bottom of the screen displays a choice of templates for adding content. Choose a template, and then follow the on-page instructions for that section on the following screen.
You can choose “File or URL,” which is a web-deliverable file you have on your server, or an external URL. Select “Choose an Authored Lesson” for a section you built in the authoring tool. Or, select “Choose a SCORM Lesson” for a SCORM compliant course.
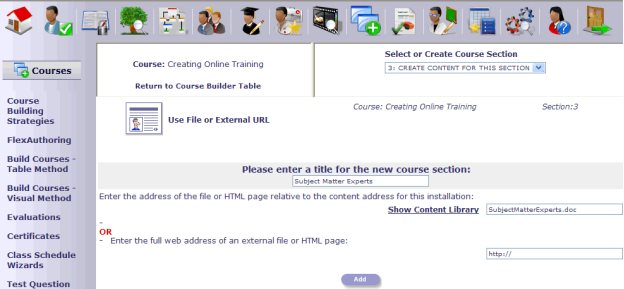
Let’s assume you have a file, such as a PowerPoint presentation, on your server that you want to use as a content section. You would click on the “File or URL” link, resulting in a screen that looks like the following:
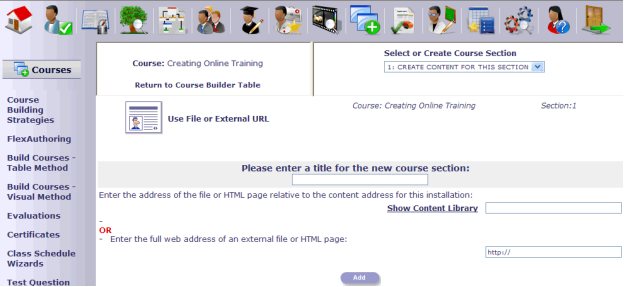
If using your default content directory (…/sections/), you may add subdirectories below it on your server to hold images, video, audio or other web pages. In fact, each location referenced as a course content section may be a complex web site with its own navigation and various content formats. Use the "Show Content Library" link to open a window displaying all files in the appropriate content area. Click on the content link to automatically load it in the content input box.
Once you have entered a title, you may type the location below the “Enter the full web address” prompt, or click on the “Show Content Library” link that displays the files you have loaded into your Content Library. This allows you to choose a file directly from the list.
Click the “Add” button to save this information. The system will locate the content and display it in the lower section of the screen immediately.
If you see an “Error 404 – Not Found” message, you have incorrectly specified the location of the material for this content section. A “Delete” button just above the content display window lets you delete the definition for this section and begin again.
If you were using an authored lesson as the content for this section, you would have clicked on the “Choose an Authored Lesson” link. Then you would have chosen a lesson from those you have authored in FlexAuthoring.
Until you add a Course Content Section, no learner will ever see your authored learning screens. For authored content, you add Content Sections in the usual manner, with a few small differences.
Click on the image that says, “Choose an Authored Lesson.” This tells FlexTraining to use a different form to help you define your Content Section. A screen will appear with a list of the learning screens that you have previously created for this course, using the Authoring Tool:
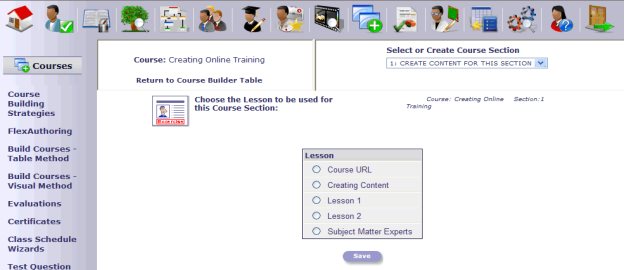
Choose any authored page. This page will become the first page loaded in the Course Content Section you are establishing.
Again, you may assign each authored page to its own Course Section, or assign all pages (which you have defined as being linked together using the Next Page field) to one section. Or, you may do something in between, with some course sections containing several authored pages and some sections containing just one or two.
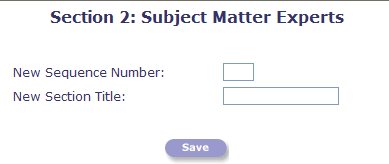
Changing Course Sequence
You may edit the order or sequence your sections are in (i.e., you would like to move Section 1 to the Section 2 position when viewed on-screen). You must do so BEFORE all of the sections have been entered. If all of the sections have been entered, you must then delete a section in order to change its sequence.

In the drop-down box, highlight the Course Section you want to move. Click the “Edit” button, and the following screen will appear. Once you enter the new section sequence, click the “Save” button.
You may return at any time to delete and add course content sections as you wish, even if classes are already being taught based on this course.
“It can’t find my file”
While adding content files to FlexTraining, FlexTraining may occasionally fail to locate your files – and yet you are sure you placed them on the web server in the right place.
When you see the "Error 404" message, it means the browser is looking for something that is not there. Right-click on the page or frame with the error message and click on Properties. It will give you the address of what it's looking for. Almost always, the second you look at the address, you know what's wrong with it. Perhaps the filename was misspelled, or you forgot to enter the name of the directory it lives in along with the filename.
For people who are using Microsoft IE 5: They get a useless "Friendly" Error page that has no information. That’s bad. A solution for that:
- Click on Tools/Options on the Menu in IE.
- Click the Advanced tab.
- Find the checkbox for "Show Friendly HTTP Error Messages."
- Clear that checkbox (make sure it's not checked).
From that point on, you’ll get a standard "Error 404" message, and you can right click on it as described above.
Working with Course Guides
If you have material you wish to use as a Course Guide, you can establish a course guide with as many chapters (one per document/file) as you wish.
Concept: Course Sections versus Course Guide
Think of a college course that meets twice a week for lecture and presentations and also has a course textbook. With FlexTraining, the Course Content sections are the lectures, and the Course Guide is the textbook.
Can they be identical? Yes, but they probably shouldn’t be. If you took a course and were merely instructed to read the textbook and take the tests, you might feel a bit slighted.
On the other hand, there may be situations where a Course Guide may be nothing more than a few pages of technical details or supplemental material. That would be an example of a one-chapter Course Guide. The Course Guide may have fewer chapters than the number of Course Sections, or more, or the same number.
If you plan to use audio, video or other high-tech material in the course, it probably belongs in the Course Section content rather than the Course Guide. A Course Guide should be more of a reference, something that is not always accessed sequentially.
If you keep the Course Guide to text and simple images, you can create a single-file word-processed document containing the guide, and FlexTraining will make it available for download from the Student Menu.
You should identify or build your Course Guide chapters or documents before continuing. These pages or documents may reside on your server, or anywhere on the Internet or your Intranet.
Defining Course Guide content is very similar to building the section content in the previous step.
The list of Course Guide Chapters will start out empty before you have defined any section content. Each entry will say “CREATE CONTENT FOR THIS CHAPTER.” The number of entries in the list will be the number of Course Guide Chapters you defined in your lesson plan for this course.
As you define Course Guide Chapters, titles and content, the titles will be filled in for the various sections (chapters) in the list. You are finished when there are no more “CREATE CONTENT FOR THIS CHAPTER” entries in the list.
Defining Each Chapter/Section
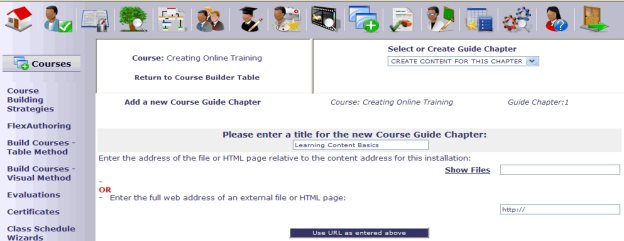
Once you have selected a chapter to add, the bottom of the screen displays the form for adding content sections. Enter a title for this Course Guide Chapter.
For the actual Course Guide Chapter contents, you may use web-based content (or a word-processed document) that you have placed in the default directory for Course Guide content, (…/guide/). Or, you may point to any other location on your Intranet or the Internet. Use the "Show Files" link to open a window displaying all files in the appropriate content area. Click on the content link to automatically load it in the content input box.
If using your default content directory (…/guide/), you may add subdirectories below it on your server to hold images, video, audio or other web pages. In fact, each location referenced as a course content section may be a complex web site with its own navigation and various content formats.
Once you have entered the title and content location, click the “Use URL as entered above” button to save this information. The system will locate the content and display it in the lower section of the screen immediately.
If you see an “Error 404 – Not Found” message, you have incorrectly specified the location of the material for this Course Guide Chapter. A link just above the content display window lets you delete the definition for this section and begin again.
After you are finished with all chapters, you may return at any time to delete and add sections as you wish, even if classes are already being taught based on this course.
You may mix and match these definition methods as you wish. For example, if your guide has 80 sections, five may be files that were already placed in the default Course Guide content location (…/guide/), and the other three may be web addresses on the Internet you wish to include in your guide.
Assessment Builder – Online Tests
Concept: Your Testing Policy
Before using the Administrator module to build online tests, decide on an overall testing policy:
Do you need to have tests at all?
Do you want students to see the correct answers and explanations after taking tests?
What should a passing score be?
Should students be able to take tests over and over until they pass?
Should all students take the exact same test(s), or should questions be randomly drawn from a pool of defined questions for each test?
The FlexTraining Management Center includes an Online Assessment Builder you can use to define online tests and test questions for each course. The number of tests you can build is the number you entered in the Lesson Plan Builder under “Number of Tests.” This number shows in the Tests column in the “Build Courses – Table Method” screen.

Access the Assessment Builder by clicking on this number (circled in green in the above screenshot). Choose a Test Name in the resulting list in the upper-right frame.
The list of Test Titles will start out empty, before you have defined any tests. Each entry will say “NO TEST YET – SELECT TO CREATE.” The number of entries in the list will be the number of tests defined in your lesson plan for this course.
An optional Test Clock lets the administrator set a time limit for completion of each test. A second timer may also be set to provide a warning to the student a few minutes before the allowed time expires.
Fill-in-the-blank tests are supported along with the multiple choice format. Additionally, the test designer may automatically direct students who fail a test to an external URL for further learning. All options may be defined for each specific test.
Define Test Policy
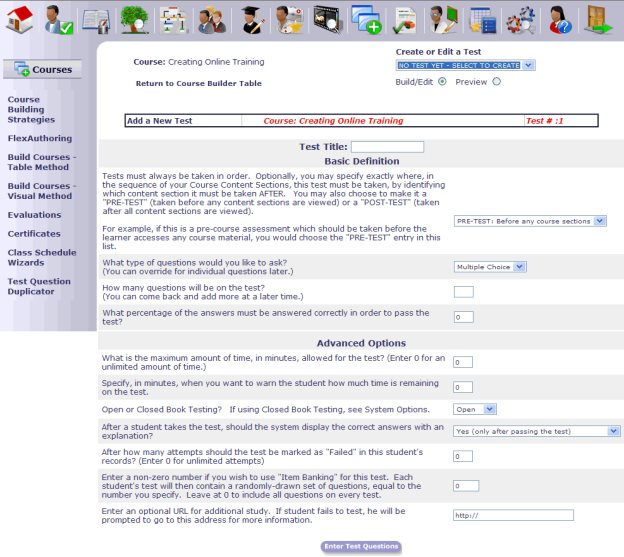
Begin by entering a Test Title, then follow the Built/Edit guidelines on the set-up page.
Specify where in the sequence of your Course Content Sections this test must be taken.
Tests must always be taken in order. Optionally, you may specify exactly where, in the sequence of your Course Content Sections, this test must be taken by identifying which content section it must be taken AFTER. You may also choose to make a "PRE-TEST" (taken before any content sections are viewed) or a "POST-TEST" (taken after all content sections are viewed).
What type of questions would you like to ask?
Choose from Multiple Choice or Fill-in-the-blank. True/False tests would use the Multiple Choice format. (If you choose “Fill-in-the-blank,” the student’s answer must match one of the five answer options you create, except the comparison is not case-sensitive).
How many questions will be on the test?
Enter a number.
What percentage of the answers must be answered correctly in order to pass?
Enter a number, such as “70,” that will be required for a passing grade.
What is the maximum time, in minutes, allowed for the test?
Enter a number here, or enter “0” for no time limit.
Specify, in minutes, when you want to warn the student of remaining time.
If you are limiting the time (using the previous field), you can have the system warn the student of remaining time by entering a number of minutes here.
Is the test open or closed book?
Choose "Open" or Closed.”
After a student takes the test, should the system display the correct answers with an explanation?
Choose the option that is consistent with your testing policy: “Yes, after passing test,” “Yes, after passing or failing test,” “Yes, after failing test,” “Yes, only after failing final allowed attempt,” or “No, never show answers.”
After how many attempts should the test be marked as "Failed" in this student's records?
Enter a number. If you entered “3,” and a student takes the test 3 times without achieving a passing score, the test is marked as FAILED and he may not take it again (enter “0” for unlimited attempts).
Enter a non-zero number if you wish to use "Item Banking" for this test.
Each student's test will then contain a randomly-drawn set of questions equal to the number you specify. For example, if you have 20 questions total, but only want to offer your students 10 random questions on this test, then enter “10” here. Leave at 0 to include all questions on every test.
Enter an optional URL for additional study.
Enter a full URL here (beginning with “https://”) if you want a student to be directed to another web site for further study (if he has a failing score on this test).
When you have completed the test property questions in this form, click on the “Enter Test Questions” button.
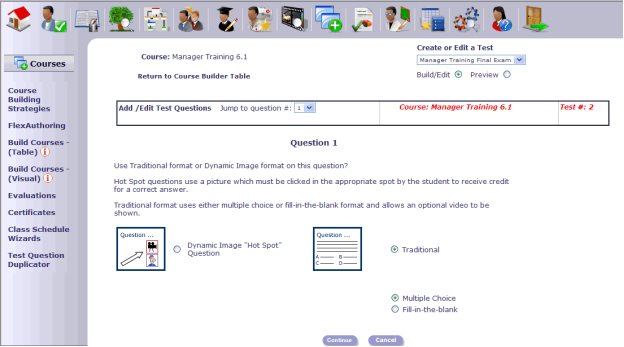
Add/Edit Test Questions
The “Add/Edit Test Questions” screen allows you to define the test questions and answers. There are two types of questions: 1) Dynamic Image “Hot Spot,” where you can upload an image and require the student to identify an area in response to the question, and 2) Traditional, which includes multiple choice or fill-in-the-blank questions. Once you select the type of question, click the “Continue” button.
If you wish to edit a single question, enter the question number in the “Jump to question #” drop down box.
There is a separate development screen for each test question. For each question, enter:
- The test question itself.
- The address (URL) or filename of an image to be displayed below the question (optional - you may leave it blank).
- Up to seven (7) candidate answers (only one will be correct).
- The correct answer letter.
- An explanation for why this is the correct answer (optional).
Click on the “Submit” button when you are finished.

Adding Assignments to Your Course
You should identify your Course Assignments before continuing. These pages or documents may be on your local PC, your web server or anywhere on the Internet or your Intranet.
Defining Assignment content is very similar to building Course Guide content.
To activate the Assignment Builder, click on the number under the “Assmts” heading in the table method screen (as circled in green above). Choose an Assignment to add from the resulting list in the upper right frame.
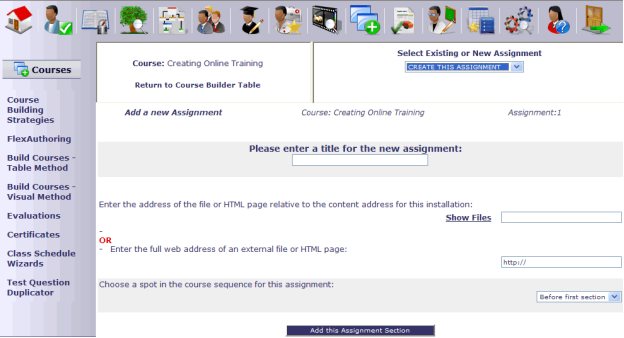
The list of Assignments will start out empty before you have defined any Assignments. Each entry in the list will read “CREATE THIS ASSIGNMENT.” The number of entries in the list will be the number of Assignments defined in your lesson plan for this course.
As you define Assignment section titles and content, the titles will be filled in for the various sections in the list. You are finished when there are no more “CREATE THIS ASSIGNMENT” entries in the list.
Defining Each Assignment
Once you have selected an Assignment to add, the bottom of the screen displays the form for adding the Assignment. Enter a title for the Assignment.
For the actual Assignment text, you may use web-based content (or a word-processed document) that you have placed in the default directory for assignments (.../assignments/). Or, you may point to any other location on your Intranet or the Internet. Use the "Show Files" link to open a window displaying all files in the appropriate content area. Click on the content link to automatically load it in the content input box.
If using your default Assignment directory (../assignments/), you may add subdirectories below it on your server to hold images, video, audio or other web pages. In fact, each location referenced as an Assignment location may be a complex web site with its own navigation and various content formats.
Once you have entered the title and Assignment location, click the “Use URL as entered above” button to save this information. The system will locate the Assignment content and display it in the lower section of the screen immediately.
If you see an “Error 404 – Not Found” message, you have incorrectly specified the location of the material for this Assignment. A link just above the content display window lets you delete the definition for this Assignment and begin again.
After you are finished with all Assignments, you may return at any time to delete and add Assignments as you wish, even if classes are already being taught based on this course.
When all the steps above are complete, you have defined a FlexTraining Course. You are now ready to add the "Course" to the catalog, thereby creating a "Class,” and to begin allowing students to sign up for training.
Build Courses - Visual Method
The Visual Course Builder creates the same course structures that the table method creates – it simply uses a visual layout instead of a table layout. The Visual Course Builder allows quick and easy assembly of your online courses and provides a more graphical view of the flow of course events.
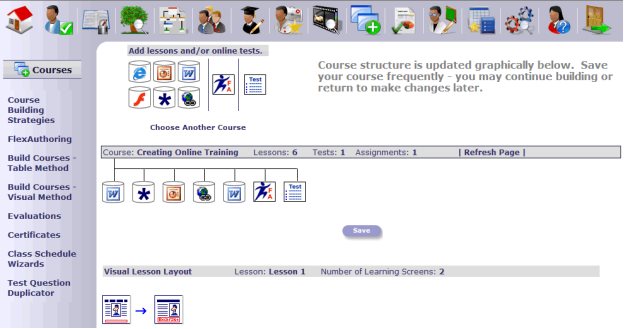
When you first select the “Build Courses – Visual Method” from the Courses Menu, the Visual Course Builder displays the following:
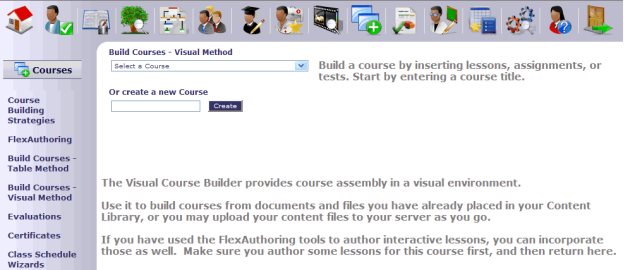
If you want to work with a course you previously created (using either the table method or the visual method), you can select it from the pull-down list. To create a new course, type a course title in the open field.
Once you have selected (or entered) a course name, you will see a screen that looks something like this:
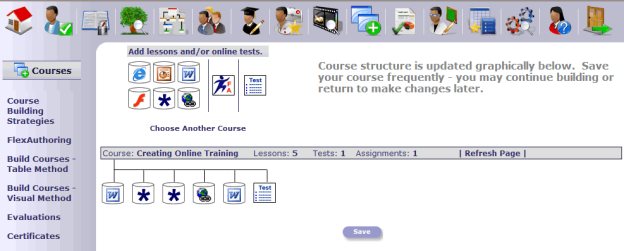
As illustrated above, the top part of the Visual Course Builder screen allows you to add course sections of various formats and to add online tests. The bottom section of the screen displays the course events from left to right, in sequential order. Any changes you make are not saved to the database until you click on the “Save” button.
In the screenshot above, two sections are Word documents, two sections are Excel files and another section is a URL page. One test was added at the conclusion of the course sections.
Working with Courses
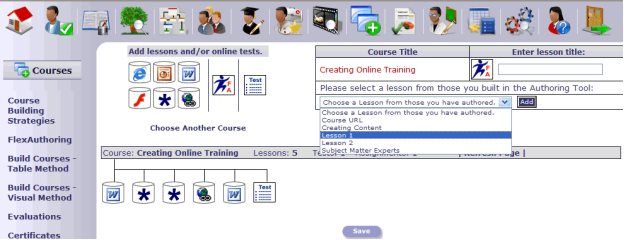
Suppose you want to add another section to this course and you want that section to be a lesson you created in the FlexAuthoring Authoring Tool. You would simple click on the ![]() icon in the upper-left frame, and a short form will appear in the upper right frame. Here you will select a lesson you have already authored.
icon in the upper-left frame, and a short form will appear in the upper right frame. Here you will select a lesson you have already authored.
Note that if you plan to use authored lessons for your course content, you would create the Learning Screens and Lessons in the authoring tool first, and then come here, to the Visual Course Builder, to sequence the lessons into your course structure.
Once you have given the new course section a title, selected a lesson, and clicked on the “Add” button, the new section will appear in its proper sequence in the lower frame.
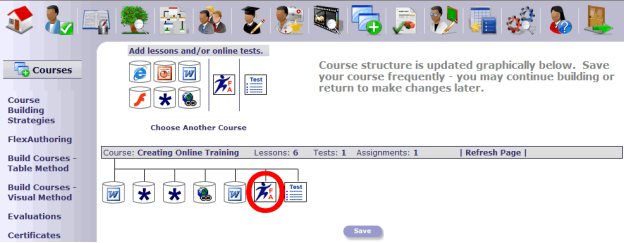
Here, the newly added section is circled in red. The change will not be saved to the database until you click on the “Save” button.
The process for adding a course section that is not an authored lesson (for example, a Word document, a PDF file, a video, etc.) is similar. However, instead of choosing a lesson from a pull-down list, you would select a file from your server.
Move, Preview or Delete a Section
The lower frame of the Visual Course Builder is where you will work with existing sections of the course. You can modify the sequence of course events, preview the content of a given section or delete a section.
Click on any course section icon in the lower frame and you will see an Info Box like the following:
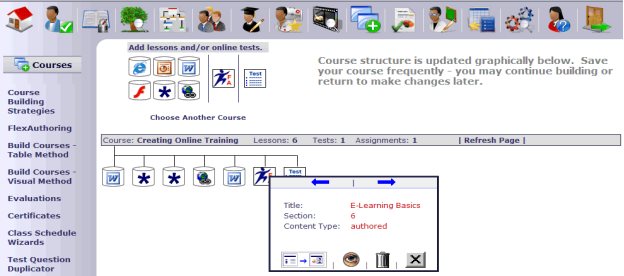
Use the blue arrows to shift the section one position to the left or right. The ![]() icon is used to display a preview of this section, and the
icon is used to display a preview of this section, and the ![]() icon lets you remove the section from the course. Note that if you delete a section, it does NOT delete any files or authored lessons from your system, it merely removes the section from its place in the course sequence.
icon lets you remove the section from the course. Note that if you delete a section, it does NOT delete any files or authored lessons from your system, it merely removes the section from its place in the course sequence.
The ![]() icon is only present if the section you have clicked on is based on an authored lesson. This icon displays a layout of the actual lesson showing the template type for each learning screen in the lesson, at the bottom of the lower frame, as illustrated below. The Visual Lesson Layout gives you a visual view of your course and lesson structure at the lowest level.
icon is only present if the section you have clicked on is based on an authored lesson. This icon displays a layout of the actual lesson showing the template type for each learning screen in the lesson, at the bottom of the lower frame, as illustrated below. The Visual Lesson Layout gives you a visual view of your course and lesson structure at the lowest level.
Adding a Test
By clicking on the ![]() icon in the upper-left frame, you can add an online Test to your course. A course can have as many Tests as you wish, including a pre-test, a post-test and tests after specific course sections.
icon in the upper-left frame, you can add an online Test to your course. A course can have as many Tests as you wish, including a pre-test, a post-test and tests after specific course sections.
After you click on the icon, the upper-right frame will display a form which lets you define basic parameters for the Test:
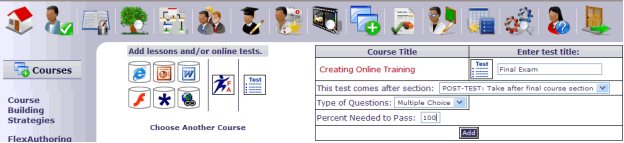
In the above example, the Test would be offered after the final course section (it’s a Post-Test), will require a passing score of 100% and will consist of Multiple Choice questions.
Evaluations
Concept: Course Evaluations
FlexTraining lets you pre-define the Course Evaluations, including the evaluation questions and the list of possible responses.
Then, when you schedule each class, you select the Evaluation you want to have the students use for that particular class. The Evaluation button appears at the bottom of the Student Menu.
Once the student clicks on the Evaluation button, the online completion and subsequent processing of the Evaluation is automatic. A student must complete all tests (and assignments if any are defined) before submitting a Course Evaluation.
FlexTraining writes all Evaluation results to its database, from where the administrator may generate reports in either Summary or Detail mode.
The FlexTraining Management Center includes an online Evaluation builder you can use to define online Course Evaluations. You may define as many Evaluations as you wish.
Each FlexTraining class may utilize one Evaluation. If the same Course is offered multiple times, each time it is offered you may select a different Evaluation to be used. We do not recommend changing the Evaluation when it is currently in use by a class. This will cause your results to be skewed.
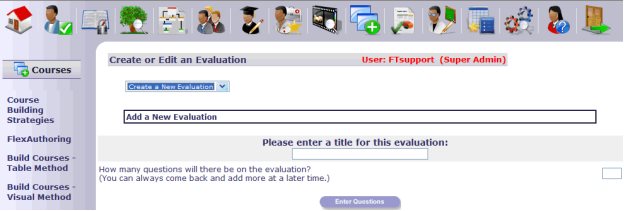
To define an Evaluation, select Evaluations from the FlexTraining Management Center Courses Menu.
Next, choose the “Select an Option” drop-down box in the upper-left frame to “Create a New Evaluation.” If you want to edit an existing Evaluation, you would select it, by name, from the list.
Define Evaluation
Enter a title for the Evaluation, then enter a number to indicate how many questions will be on the Evaluation. Select the “Enter Questions” button.
Add/Edit Evaluation Questions
Next, use the Add/Edit Evaluation Questions screen to define the questions, and the possible responses, for this Evaluation. You may enter your own response text for each possible response, or you may use the pre-entered text as shown. All Evaluations will have one free form text area for students to write additional comments.
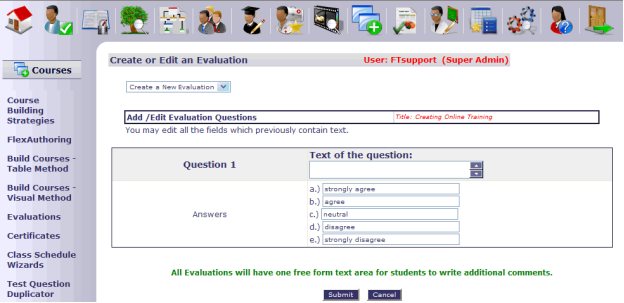
When you have completed the entry of all questions in this Evaluation, click on the “Submit” button.
Certificates
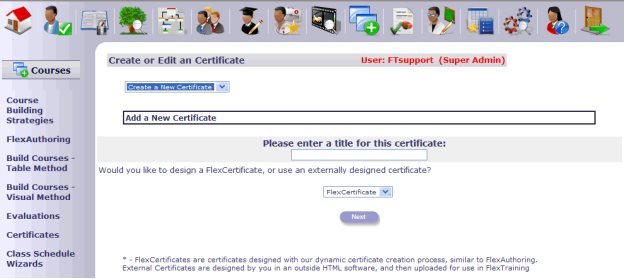
The Certificates module allows you to build Certificates right in FlexTraining.
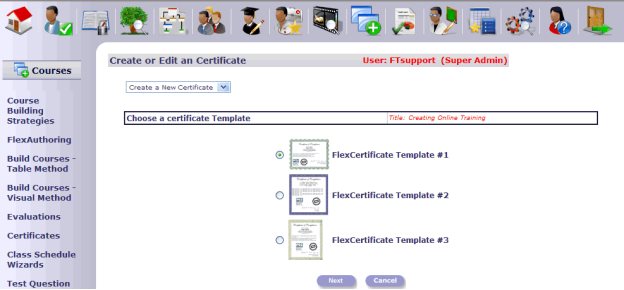
The Certificate Module allows you to choose a certificate template style, set the font, write up a text blurb, load a company logo and seal and provide a manager’s signature image.
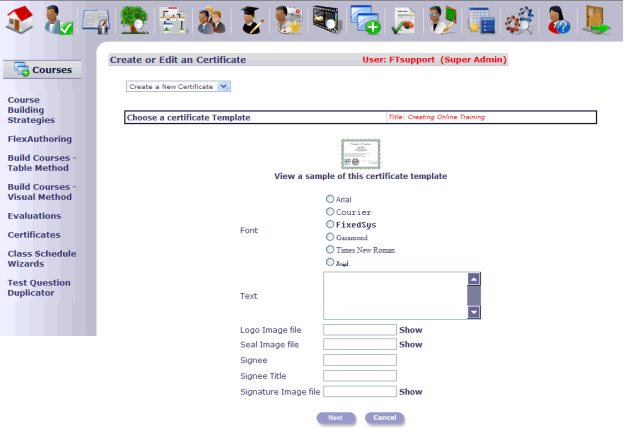
Clicking on any of the “Show” links will allow you to choose an image or upload an image into FlexTraining for use as a logo, seal or signature.
Class Schedule Wizards
Schedule a New Class
The Class Schedule Wizard quickly schedules a course and adds it to the online catalog. A single course may be scheduled many times, thus creating many classes. Each class may or may not have an instructor, and each carries its own setup options. Options are arranged into related groups under each folder-style tab at the top of the screen. Make selections, save your changes and use the tabs to jump between option groups as needed.
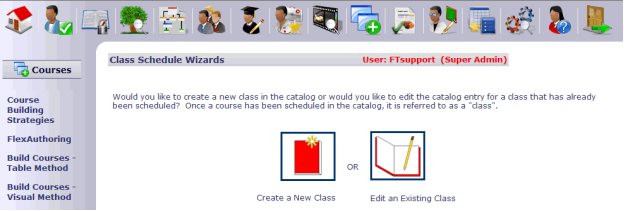
A course must be added to the catalog before students can sign up for training. Adding a course to the catalog creates a class.
Use the following options in the Schedule Wizard to set up a class:
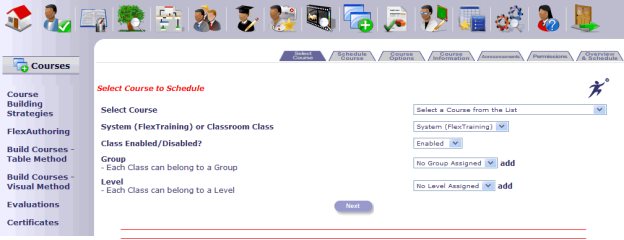
Select Course
Select the Course to Schedule
Select from the drop-down box of authored courses.
Select System (FlexTraining) or Classroom Class
If you are tracking off-system courses, select “Classroom Class.”
Choose Class Enabled/Disabled
Choose “Enabled” or “Disabled.”
Select Group
Allows the user to group related courses by Group.
Select Level
Allows the user to assign Levels to courses.
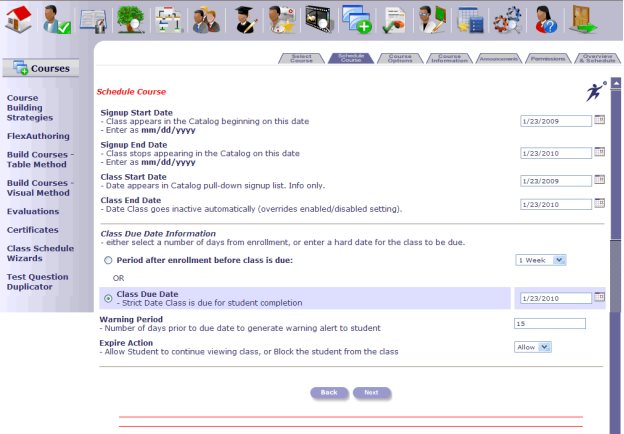
Schedule Course
Class automatically appears in the Catalog beginning on this date. Enter as mm/dd/yyyy.
Class automatically stops appearing in the Catalog on this date. Enter as mm/dd/yyyy.
Date appears in Catalog pull-down signup list. For information purposes only.
Enter Class End Date
Date class automatically goes inactive.
Select Class Due Date Information
Select a number of days from enrollment or enter a hard date for the class due date.
Enter Warning Period
Number of days prior to class due date to generate a warning to the student.
Choose Expire Action
Allow student to continue viewing class or block the student from the class.
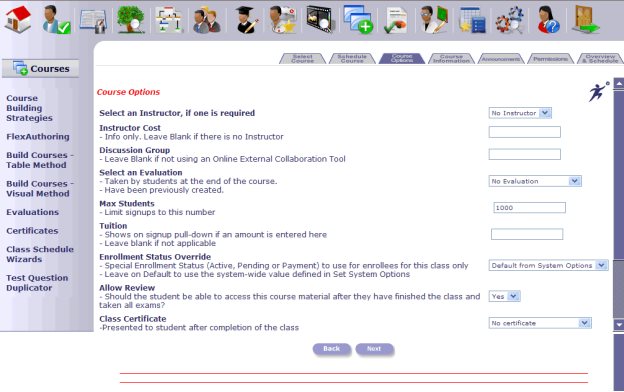
Course Options
Select an Instructor if one is required.
For information only. Leave blank if there is no Instructor.
Select a Course Evaluation from the list of those you have defined. When Students complete the Evaluation, it is saved to the Evaluation database for detail or summary reporting.
Limits enrollment to the designated number of students.
Tuition will show on Student Signup pull-down list if an amount is entered here. Leave blank if not applicable
Tuition must be a number. It is acceptable to put 10.50 or just 10, but do not enter the currency symbol as this is already set from the System Environment. If you accidentally put one here, you will have two showing up in the list (for example: $$10.50 instead of $10.50).
Select Enrollment Status Override
Special Enrollment Status (Active, Pending or Payment) to use for enrollees for this class only.
Leave on Default from System Options to use the system-wide value previously defined in the System Environment.
Select Allow Review
Allow student to access the course material after completing the class and taking all exams.
Choose Class Certificate
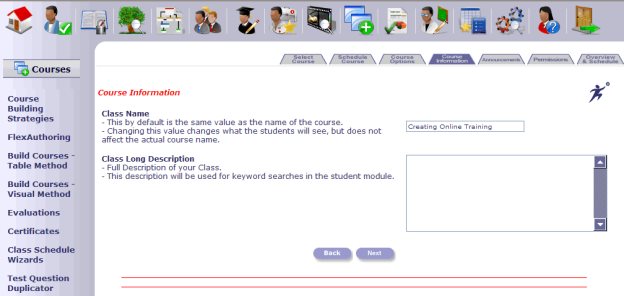
Course Information
Enter Class Name
Enter the same value as the name of the course.
Enter Class Long Description
Provides a full description of the Class that will be used for keyword searches in the Student Module.
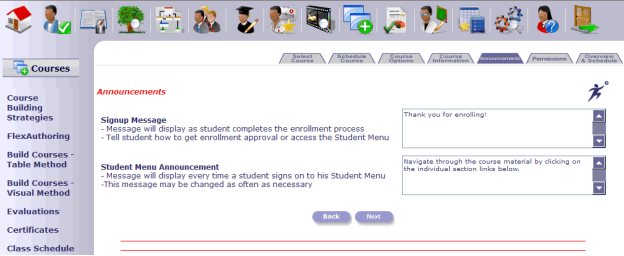
Announcements
Enter Student Menu Announcement
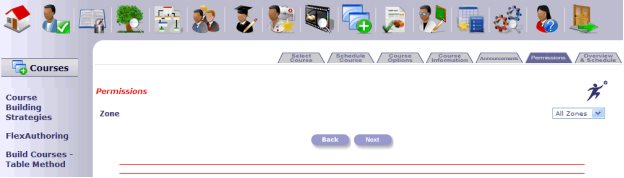
Permissions
The Permissions screen allows you to set one to four levels of hierarchy for a class. You can control access to any class by establishing hierarchy levels as noted above.
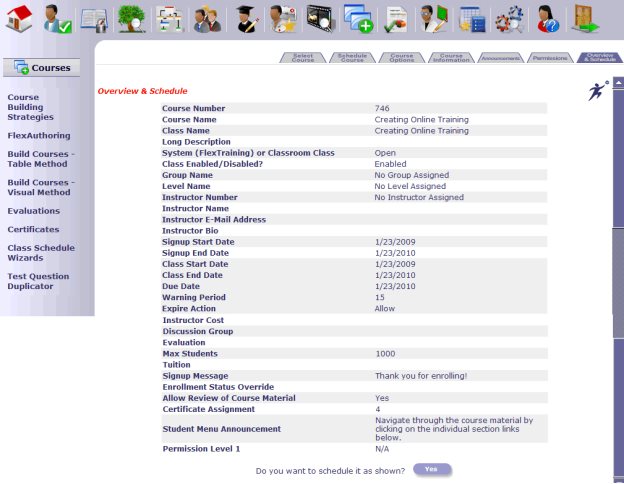
Overview & Schedule
This is an Overview of all the options you selected while setting up a class. You may click “Yes” to Schedule or go back through the tabs to make additional changes.
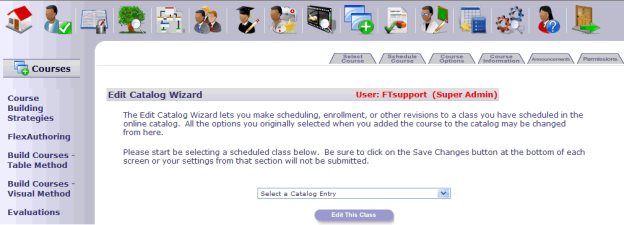
Edit Existing Class
Use this option to edit existing catalog entries as defined in the Class Schedule Wizard option.
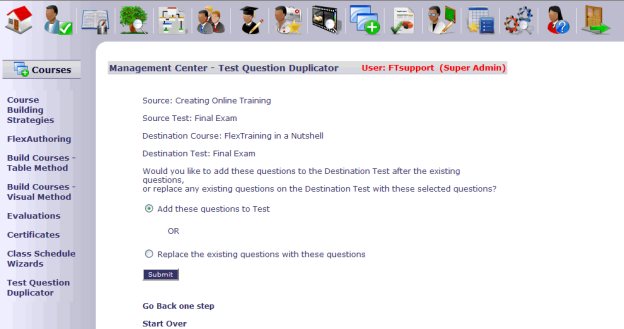
Test Question Duplicator
You can create a duplicate set of test questions, in the same course or in a different course, by selecting a Source Course and a Source Test from the drop down boxes.

Once these are selected, choose a Destination Course and a Destination Test from the drop down boxes.
Once your Source and Destination courses and tests are selected, you have the option to add the questions to the test or replace the existing questions. Click the “Submit” button to complete.
![]() FlexTraining Version 6.1 Page 1
FlexTraining Version 6.1 Page 1