
FlexTraining Management Guide

The FlexTraining Total e-Learning Solution
Management Guide
Version 5.2
Copyright 1998 - 2006 Online Development
Overview
FlexTraining is a web based training solution for building and delivering education over an Intranet or the Internet. It is a complete framework for structuring and conducting training classes of virtually any length or substance.
FlexTraining gets its name from its high level of adaptability. It may be configured in a variety of ways. Instructors are optional, Discussion Forums are optional, and each course can have a user-defined number of Sections, Tests, Assignments, and Course Guide chapters. Use of the Virtual Document Libraries feature is also optional.
FlexTraining is built on the concept of customer-defined training content. It provides a framework for constructing and administering training classes of almost any type. For example, if your users all have video plug-ins in their web browsers and fast network connections, your content can be loaded with video. If all students will have Audio or Shockwave plug-ins, these types of content are allowed as well.
If, on the other hand, your audience will access the training facility through modem connections over the public Internet, you might choose to use HTML and images only, for faster response time and greater compatibility.
FlexTraining consists of two separate applications, both sharing a common database:
Management Center:
Set system configuration values, establish policies, define courses, tests, and assignments, build course guide, schedule classes, assign instructors, approve enrollments, run reports, and monitor classes. Management Center is also used to define Dynamic Messages and to author training content.
Student Module:
Register for a class, sign on to your class, view course content, navigate through (or download) the course guide, receive assignments, take online tests, track your progress online, make entries in a personal Course Notebook, or jump to the Discussion Forum.
The two applications share student and class data, but each has its own separate address on the web server, and its own separate security. The installation procedure installs both modules.
System Requirements
FlexTraining runs on a Windows 2000 Server or newer, with Internet Information Server, version 4.0 or newer.
Server Requirements:
- Microsoft IIS Server 4.0 or better
- Windows 2000 Server or newer
- MS Access or SQL Server DBMS with ODBC Drivers (Recommend MS Access)
- Internet/Intranet connectivity depending on expected student/user volume
Management and Student (Browser) Requirements:
- Any forms-capable and table-compatible web browser, at least Microsoft IE 4.0 for Management Center
- Email Client and (optional) News Reader for Online Discussion Forums
- Windows, Mac, or UNIX computer with Internet or Intranet connectivity at 56 Kbps or faster
- Management Center is designed to work best with Internet Explorer.
Installation
FlexTraining installation is very simple, consisting of three steps:
- Install software from CD
- Perform manual server setup tasks
- Verify Installation
Step 1: Install software from CD
At the web server machine, sign on as a member of the Administrators Group.
Run the program Setup.exe on the FlexTraining Installation CD (If your CD ROM Drive has the Autorun capability, the setup program will start by itself). When prompted for a directory to install to, choose any directory on the server. It is a good idea to create and use a target directory such as “d:\FlexTraining” or “e:\FlexTraining.”
You may decide to choose the directory called /InetPub/wwwroot on the drive where the web server is. That directory is called the Web Server "Document Root.” However, you may install the FlexTraining software on any drive and directory you wish.
When the process is complete, you have completed Step 1. You may remove the Installation CD from the CD ROM Drive.
Step 2: Perform manual server setup tasks
Below the directory you choose to install to, you should have the following directories:
FlexTraining
Database***
FlexTraining
ASP *
Certificates
Content
FT_Libraries
assignments **
Exported_Courses
guide **
images
SCORM
photos
sections
System
Audio
AT_items
Certificates
Hot_spot_images
Backgrounds
Video
images
Temp
Logos
Flash_Movies
Images
StudentNotes **
Syllabus
Custom
TempFiles**
Images
FlexTrainingAdmin *
Authoring_Tool
Certificates
Cgi
Flexdocs
FlexdocsUpdate
FTChat
FTMB
Images
Instructor
Interface
Ocx
reporting
tempFiles**
* These are the directories pointed to by your Virtual directories. They are the actual "home" directories for the three modules.
** The ftAdmin/TempFiles, ASP/StudentNotes directory, the ASP/content/guide directory, and the ASP/content/assignments directory all must have Write permission set for the Internet Web Server Account, since files may be created here during the class definition process. Your system administrator should be able to use the Windows Explorer to set Permissions for any given directory.
*** The database directory needs to have read, read & execute, write, and modify permissions set on the database file in order to work properly.
- Set up Virtual Directories
The directories marked with an asterisk (*) are the two Application Directories. You should set up a Virtual Directory for each of these Application Directories, using the Internet Service Manager application that comes with the Web Server.
Set up a Virtual Directory for the two applications, making sure you set “Read and Execute” permissions for each. Also make sure the Default Document (under “Documents”) is set to “default.asp” for each:
|
|
Virtual Directory Name (alias) |
Referenced Location |
|
1 |
Any Name (suggest “FT”) |
FlexTraining/FlexTraining/ASP (Student module Application Directory) |
|
2 |
Must be “FlexTrainingAdmin” |
FlexTraining/FlextrainingAdmin (Management Center Application Directory) |
When you are finished, you should make sure that IIS knows that it should deliver the page called "default.asp" when a URL with no page name is executed. Go back to each Virtual Directory, right-click and select Properties, then choose "Documents.” Make sure that "default.asp" is in the list of documents. If it is not, add it.
Next, we will tell the IIS server that it's OK for the Administrator to see what files are available in the server's content area, to help the Administrator in building Courses.
Using the Internet Service Manager: Locate the directory called "Content" just under your FlexTraining virtual directory (may be named "FT" or "FlexTraining"). Then:
- Right Click on the "Content" directory
- Choose Properties
- Place a check in the "Directory Browsing Allowed" box
- Set up directory security
All the directories in Flextraining version 5.1 should have anonymous access (read/write/execute) permissions given to the IUSR_MachineName account, with the exception of the directories noted on page 7.
c. Place CGI Script in CGI BIN directory
Locate three files in the directory “FlexTrainingAdmin/cgi,” called “PERL.exe,” “Perl300.dll,” and “VB_STD_UP.pl.” Copy these three files to the cgi-bin directory under your server’s document root. If it is not there, create it. Normally, this is the directory “inetpub/wwwroot/cgi-bin.” In IIS 6, you will need to enable CGI-applications in the web extentions control panel.
d. Add Perl MIME Type to Web Server
- In IIS, Right click on your website and choose properties.
- Go to the Home Directory tab and click Configuration.
- Under App Mappings, add a new extension for .PL
- enter D:\InetPub\wwwroot\cgi-bin\perl.exe “%s %s”, where “D” is the drive containing the server’s document root
- Save these changes
- Stop and restart the IIS Web Server
*If you are using Windows 2003 Server, you will need to enable the Web Extension for Perl CGI Scripts. To do this, open IIS, choose Web Extensions, click on the “Add a New Web Service Extension” link. Enter “CGI-Script” for the extension name, and the same path from above (D:\InetPub\wwwroot\cgi-bin\perl.exe “%s %s”) as the “Required File.” Make sure you have the “Set Extension Status to Allow” option checked.

Note: If you omit setting up PERL as a MIME type on your server, FlexTraining will still function. The only feature, which will not work, is the "Direct Upload Method" option in the Management Center, within the Assignment Builder and Course Guide Builder screens. The uploads to the Virtual Document Libraries will also be disabled. At this point, you may place the files directly into the folders on the server, and the documents will be accessible.
e. Set up an ODBC Source
FlexTraining uses ODBC to connect to its database. Before you can run any of the FlexTraining modules, you must define an ODBC Source on the Web Server machine. Please make sure this matches the DB_String.inc files.
- Open the Control Panel, click on Administrative Tools, and Select the “Data Sources/ODBC” Icon.
- Click on System DSN.
- Click on Add.
- Select the Microsoft Access Driver (or SQL Server) and click on Finish.
- Enter Flextraining5 as the data source name.
- Enter a description, such as “FlexTraining database.”
- Click on the Select button.
- Choose the Flextraining5.mdb file in the directory FlexTraining/database.
- Close each dialog box by clicking on OK.
- Repeat steps 1 through 9 but enter FTMB5 as data source name and the choose FTMB5 in the directory FlexTraining/database for step 8.
f. Register graphing tool (an optional step)
FlexTraining includes an Instant Performance Graphing feature in the Management Center. It instantly graphs test performance, plotting class averages against your defined passing scores.
If you plan to use the graphing feature, you need to "register" the graphing tool on the server, as follows:
- Locate and identify the graphing tool "teechart.ocx" file in the directory "OCX" under your FlexTrainingAdmin Directory.
- Note the full path to this file. For example, if you installed FlexTraining on the Server's D drive: d:\inetpub\wwwroot\flextrainingadmin\ocx\teechart.ocx.
- At the server, either open the Run box (Click on Start/Run) or go to DOS mode and type the following command.
Regsvr32 fullpathToYourOCXfile:
For example:
Regsvr32 d:\inetpub\wwwroot\flextrainingadmin\ocx\teechart.ocx
If you are unable to register the TeeChart OCX file (which may be the case if a 3rd party is hosting FlexTraining for you, for example), FlexTraining will still operate normally. The ONLY feature you will not be able to use is the Performance Graphs feature on the FlexTraining Management Center menu.
g. Register FTController_5_1.dll file
FlexTraining includes a FTController_5_1.dll file that automates certain features in FlexTraining.
You need to "register" the FTController_5_1.dll on the server, as follows:
- Locate and identify the FlexControl.dll file in the directory "CGI" under your FlexTrainingAdmin directory.
- Note the full path to this file. For example, if you installed FlexTraining on the Server's D drive: d:\inetpub\wwwroot\flextrainingadmin\cgi\FTController_5_1.dll.dll.
- At the server, open the Run box (Click on Start/Run), or go to DOS mode and type the following command.
Regsvr32 fullpath To Your FTController_5_1.dll
For example:
Regsvr32 d:\inetpub\wwwroot\flextrainingadmin\cgi\ FTController_5_1.dll
Step 3: Set Up Your Management Center Login
The first time you access the Management Center, the login is set to the system default:
Login: Admin
Pwd: default
This login is for first time use and should be changed immediately for your own security. You may change your login by going to the User’s Menu. Click the pencil icon by Admin to change the login.
Step 4: Verify Installation
Please note the Virtual Directory names you used in the last step. Those names, when combined with your server’s fully-qualified name, will become the URL’s (addresses) for the three applications.
For example, if your server’s Host Name is “train” and your domain is “mycompany.com,” then the address for the FlexTraining Management Center is:
https://train.mycompany.com/FlexTrainingAdmin
And the address for the Student module is:
https://train.mycompany.com/FT
Students use this address to SIGN UP for classes, as well as participate in each class once they are enrolled.
Access the FlexTraining Management Center at:
https://train.mycompany.com/FlexTrainingAdmin
(Use your actual host and domain name.)
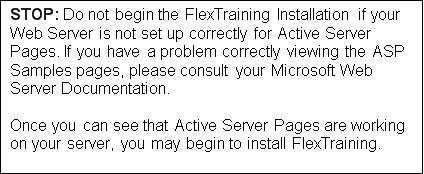
Choose the second button on the screen, the “Options” button. You should see a page displayed on the screen, which resembles the following:
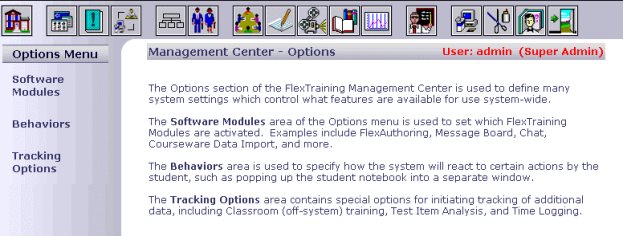
If you see a screen like this one, you have successfully installed FlexTraining’s Active Server Pages and database. If you don’t, recheck the preceding steps in the Installation procedure.
Tuning Your "Time Out" Settings
ASP applications, such as FlexTraining, maintain information about each user in what is called a "Session Object.” The Session Object remembers things like who you are, what you are doing and the name of the database you are working with. A separate Session Object is maintained for each user each time they access any FlexTraining module.
The IIS Web Server, not FlexTraining, creates and maintains all Session Objects. If you are inactive (you don't change screens or click on any links) for a period of time, the server erases your Session Object in order to free up memory for someone else to use. When this happens, it is called "Timing Out."
How long does the Web Server wait before timing someone out? Well, that's up to you. You can set the timeout value, in minutes, for each application on your system, including FlexTraining's Student module, Instructor module and Management Center. The default value in the server is usually 20 or 30 minutes, but you can change the setting if you find that too many users are "timing out.”
For example, some Administrators find that the system times out when they are defining test questions and answers in the Management Center. As a result, they will go and adjust the timeout value for the Management Center to a higher number.
To Change the Setting for a Given Application: (These instructions are for IIS version 4.0. They may vary slightly for newer versions of the Web Server).
- Open the Microsoft IIS Management Console (Internet Service Manager) and locate the Virtual Directory you have established for the module you are interested in (ex: FlexTrainingAdmin). The Virtual Directory names are normally highlighted in blue.
- Right-click on the Virtual Directory name, choose properties, choose the "Virtual Directory" tab and then click the "Configuration" button near the lower right.
- Choose the App Options tab and then find the Session Timeout field. Set this value and then click OK until all dialogue boxes are closed. Be careful if setting a value much more than 45-60 minutes, since keeping the Session Objects alive for too long wastes memory and could slow the server down.
Changing Database Management Systems
FlexTraining is shipped with an MS Access database. For most customers and situations, you should use MS Access as your database Management System throughout the life of your training system. It is very easy to use, is portable so that you may easily move it to a new server if you need to, and supports a large volume of activity. Even though it is called a “desktop” database, Access works quite well with FlexTraining in a network/internet environment.
It is recommended that you initially set up FlexTraining using MS Access, do a quick run through to make sure that everything is working properly, and then migrate to MS SQL. This will help troubleshooting immensely, if any issues arise.
If you have decided, due to very high usage or a corporate standard, to move the data to MS SQL Server, you can do so very easily. In summary:
- Migrate the data from Access to SQL Server using one of the Microsoft-supplied data migration tools, either upsizing from Access or Importing into SQL Server.
- Edit the file called “DB_String.inc” in your FlexTrainingAdmin directory, your Flextraining/ASP directory. In each file, simply change the connect string to match your database manager, your database name, and your database ID and Password, if required. YOU MUST EDIT THE CONNECT STRING IN BOTH FILES (Actually one file in 2 Directories).
- This file contains template strings that are very easy to edit; it’s really just a matter of commenting and un-commenting a couple of lines of code and editing the Database Login information. Make sure the 2 DB String.inc files always match each other exactly.
After making the edits, you can restart (Open any module from a new browser session) the FlexTraining Modules and they will connect to the new database.
If you have problems, contact your Network or Database Administrator.
NOTES:
-
If you do not have sufficient technical and database (SQL Server) expertise internally to migrate a set of tables from Access, then by all means, you should consider keeping the data in Access. Most FlexTraining customers leave their data in MS Access permanently. Those who do not feel comfortable migrating to SQL Server and managing a SQL server database will need to keep their data in Access.
FlexTraining code supports SQL Server, and has been tested with it. - Our database structure has been carefully and intentionally designed to not include validation logic, data relationships, and even record keys within the database, so there is no "Schema" to migrate, only tables to copy. That keeps migration very simple.
- Sometimes when you copy database tables from Access to SQL Server, SQL Server fails to properly set up the Auto-increment fields. These are fields that automatically set their own value (a counter) whenever a new record is added. You will want to verify that for every table, the field called "ID" is set to be an auto-increment field in SQL Server. The one exception to this is the Course Definition table, where the auto-increment field is called "Course_Def_Number.” Within SQL server, you can use the table management interface in the Enterprise Manager (GUI) to set the Auto-Increment flag for these special fields.
-
Sometimes when you convert your data to SQL Server, the online tests with FlexTraining will have errors.
If this happens, you can easily resolve the errors by making data type changes within SQL Server: In the Test_Detail table, set the Type for field "Question" to "nvarchar" and the length to be any number up to 4000 (depending on the length of your questions). You will also want to set the Type for field "Rationale" to "nvarchar" and the length to be any number up to 4000 (depending on the length of your rationale). In the Classes table, make sure that the Type field for "Syllabus_Address" is set to "nvarchar.” You can set this length to be 255 characters (or more), and this will alleviate the need to have shorter Syllabus URLs. - For issue resolution and ease-of-support, MS Access is the preferred database for FlexTraining.
Operating the Management Center
The Management Center gives you complete control over the structure and flow of each class offered. It lets you configure system behavior, course content, class scheduling, student signup, and use of optional features such as the Message Board and the Instructor module.
All setup, definition, and course management functions may be accomplished through the administrator buttons.
Concept: “Course” vs. “Class”
A Course is a collection of definitions and material, such as content sections, a course guide, tests, and optionally, assignments. A course is not scheduled and has no instructor(s) or students.
When a course is scheduled (placed in the Course Catalog) it becomes a Class. A Class may be thought of as an instance of a Course. One Course may be offered several times, and therefore several classes may be built on the same Course.
A Class has Start and End dates, and may have an Instructor. Students may enroll in a Class, once it is placed in the catalog. From then on, all Student activity is associated with that Class.
Courses and Classes are both defined from the Management Center menu. You create a Course under the Lesson Plan Builder option, and you create a Class under the Scheduling Wizard option.
Options Menu
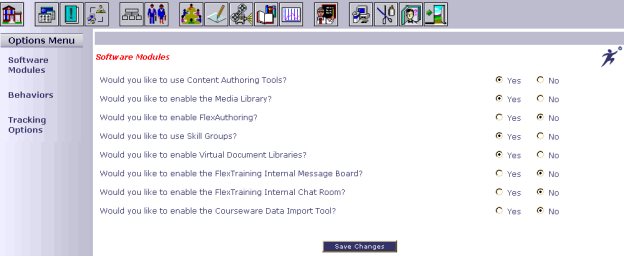
Software Modules
The system allows you to customize and configure your e-Learning environment without programming. Your setup options are organized into related groups and are placed under the appropriate menu item. Make selections, save your changes, and jump between option groups as needed.
Enable Content Authoring Tools
Indicate whether or not you will be using the built-in FlexTraining Authoring Tools. Enter "Yes" if you wish to activate the Authoring tools. Affects certain screens during course building.
Enable Media Library Objects
Indicate whether or not you will be using FlexTraining Dynamic Messaging windows. Used primarily in conjunction with page authoring and interactive "hot spots.”
Enable FlexAuthoring
Choose “Yes” if you have licensed the FlexAuthoring Premium Content Authoring module. System will check your run code to verify licensing, and then activate FlexAuthoring.
Activate Skills Tracking
Set to "Yes" to activate the Skills and Skill Group tracking features. Set to "No" if no tracking is required for courses and Skill Groups.
Activate Virtual Document Libraries
If you have electronic images you want to make available within the Student and Management Center modules, set to "Yes.” If it is set to "No,” there will be no mention of these features in the Management Center and Student modules screens.
Enable Message Board
Set to "Yes" or "No.” If "Yes,” the Control Panel will contain a button for accessing the Message Board for the class the student is signed onto.
Chat Room
Set to "Yes" or "No.” If "Yes,” the Control Panel will contain a button for accessing the Chat Room for the class the student is signed onto.
Courseware Data Importing
Import 3rd party courseware data records. Rarely used.
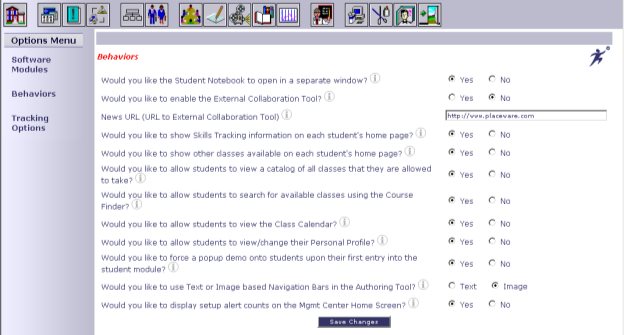
Behaviors
External Collaboration Tool (Discussion Forum)
Set to "Yes" or "No.” If "Yes,” the Control Panel will contain a button for accessing an Discussion Forum for the class the student is signed onto.
Show Skills Tracking Information
Set to "Yes" or "No.” If "Yes,” the Skills Box will be available for student use.
Show Other Classes Available
Set to "Yes" or "No.” If "Yes,” the Other Available Classes box will be available for student use.
Allow Students to View a Catalog
Set to "Yes" or "No.” If "Yes,” the Catalog will be available for student use.
Allow Students to use Course Finder
Set to “Yes” or “No.” If “Yes,” the Course Finder will be available for student use.
Allow Students to view the Class Calendar
Set to “Yes” or “No.” If “Yes,” the Class Calendar will be available for student use.
Allow Students to View/Change their Personal Profile
Set to “Yes” or “No.” If “Yes,” the student may modify their address and personal information.
Show Student a Demonstration upon First Entry
Set to “Yes” or “No.” If “Yes,” upon entering the student module for the first time, the student will see a popup flash tutorial to help understand how to use FlexTraining properly.
Text or Image Based Navigation Bars
Select Text Nav Bars if you are displaying this learning in a low-bandwidth environment.
Use Set Screen Width in Authoring Tool
Select whether you would like to make authoring screens 800 pixels wide or allow them to scale to 100% of the screen width.
Show Setup Alerts on Mgmt Center Home Screen
If you have a large number of courses and classes and notice a delay in the opening of your Management Center Home Screen, setting this to “No” may speed up the load.
Use Scrollbars on Mgmt Center Home Screen
Select if you would like to use scroll bars to display course and class information. Recommended when using a large quantity of classes.
Prevent Session Timeouts
The main purpose of this option is for overriding the asp session timeout if Windows Server does not accept your changes in IIS.
Windows Media Player
Displays Stop, Rewind and Play buttons when students view wmv. movies.
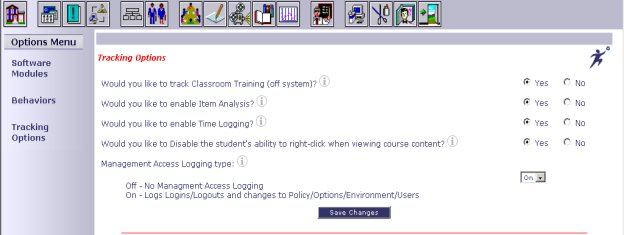
Tracking Options
Track Classroom (Off-system) Training
Set to "Yes" if you also plan to track training classes that are not conducted on this training system - in other words, "Classroom Training.” Set to "No" if you are only tracking classes offered through FlexTraining.
Allow Item Analysis
Set to "Yes" to activate DETAILED logging of each test question and answer by each student - needed for Item Analysis Report. Use with caution - creates MANY database records.
Time Logging
Set to "Yes" to activate DETAILED logging of student activity. (i.e.; access to course material and test records.)
Disable Right-Click
Set to “Yes” to prevent students from easily viewing the source code of their courses. This helps prevent theft of course materials like SWF files that are meant to remain private.
Management Center Access Logging
If you wish to log all critical activity happening in your Management Module, turn this feature on. If you have more than one Management Center user, it is recommended that this setting be turned on.
Policies Menu
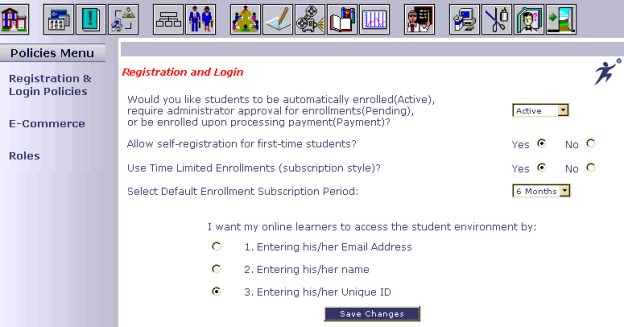
Registration and Login
Set Enrollment Status for New Students
Status that new student's enrollment will be set to. If it is set to "Active,” students may sign on immediately. If it is set to "Pending,” the Administrator must approve enrollment before student can sign on. Use "Payment" to require Credit card processing.
Allow self-registration for first-time students
Set to “Yes” or “No.” “Yes” enables students to register without administrative approval.
Use Time Limited Enrollments
Set to “Yes” or “No.” This function works like a subscription where students would have access for a set period of time.
Default Enrollment Subscription Period
Determine the length of subscription that will be available.
Decide how learners access the student environment
Choose from email address, name or unique ID.
e-Commerce
In order to process credit cards, you need to have an account with an online clearing house. Basically, a clearing house offers a service that approves or declines the credit card that is sent to them electronically via FlexTraining.
Set Up
This will require system settings to be entered within the e-Commerce section of the Policies Menu.
The Clearing House that you have chosen will give you specific information relating to your account with them. This should include, but is not limited to, a username, password and gateway URL.
Enter the above information in the corresponding e-Commerce Account, Login and Password input boxes.
Once these few changes have been made, you will want to verify that the names and values are set up to your Clearing House specifications. Then you are done with this page.
FlexTraining has an electronic form (ASP/payment_process1.asp) already created. When a Student registers for a class, they are redirected to the payment process pages. Once they have entered their credit card information, the form is sent. The clearing house will then process the credit card, determine whether it is approved or declined, make the charge and send an authorization code back to FlexTraining. FlexTraining, at that point, interprets the code and produces a message accordingly (ASP/payment_process2.asp).
Use the e-Commerce section to specify how you will process credit cards.
E-Commerce Payment Type(s)
Choose the type of payment that you’d like to accept.
E-Commerce Account
Enter account name or number in the input box.
E-Commerce Login
Enter e-commerce account login.
E-Commerce Password
Enter e-commerce account password.
E-Commerce Transaction Key
Enter your Authorize.net Transaction Key.
PayPal Account
If you would like to enable students to pay for classes using their PayPal Account, enter your Business PayPal Account.
Tuition
When you use Schedule Wizard or Edit Catalog Wizard, make sure that you have the following items filled in:
Tuition must be a number. It is acceptable to put 10.50 or just 10, but do not put the currency symbol, as this is already set from the System Configuration Wizard. If you do accidentally put one here, you will have 2 showing up in the list (for example: $$10.50 instead of $10.50).
Enrollment Status Override should be set to Payment, no matter what you have set in the System Configuration Wizard.
After payment is approved by your clearing house, the student will have a link to take them back to the Sign On screen for the class they just registered and paid for.
Note: If you would like to enable students to pay for classes using their PayPal Account, enter your Business PayPal Account in the corresponding input box within the eCommerce area of the Policies Menu.
Promo Codes
Add a Promo Code
Entering a promotional code requires a code name, class selection, promo code, price, start date and expiration date. Promo codes offer special pricing to students who enter the code when enrolling in a course.
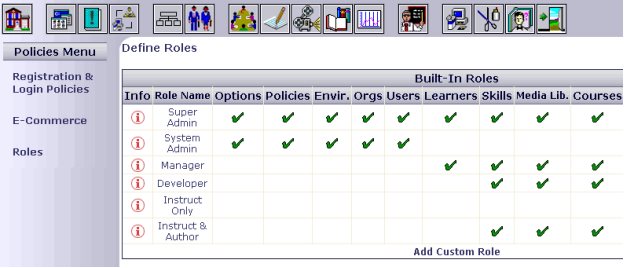
Roles
Built-in Roles
Certain roles have been built in with default settings.
Custom Roles
Custom roles may be created by clicking the “Add Custom Role” link at the bottom of the chart.
Environment Menu
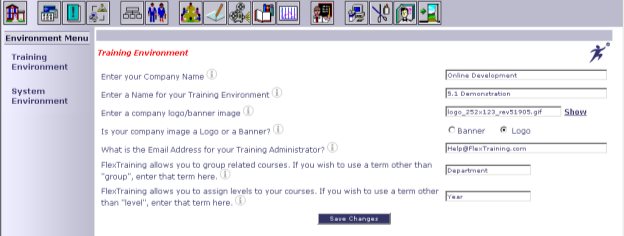
Training Environment
Company Name
Enter your company name.
Name for your Training Environment
Enter the name for your training facility, organization, company or site. This will be used on various screens.
Company Logo
You may upload a company logo for the training environment.
Logo or Banner Image
Choose whether the image you have chosen in the previous option is a company logo or a company banner (wide).
Image for Login Pages
Choose an image to display on the login pages in your admin and student module.
Email Address for your Training Administrator
The Email address of the system or course administrator. Mail will go to this address if a student clicks the Email Administrator link.
Group Related Courses
You are able to group related courses. Specify if you want to use a term other than "group.”
Assign Levels
You are able to assign levels to courses. Specify if you want to use a term other than "level.”
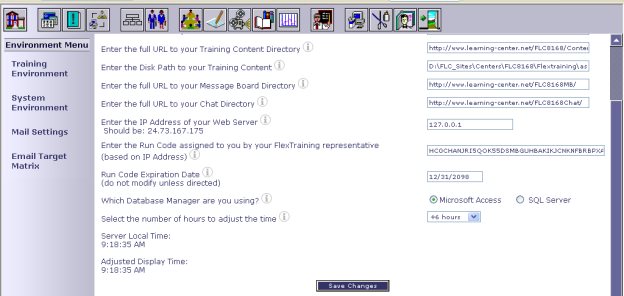
System Environment
Full URL to your Student Module
The full URL for your Student Module, as installed. Include Domain, host name and directory where application lives.
Full URL to your Administration Module
The full URL to the FlexTraining Management Center module. Normally it is your server's URL followed by "FlexTrainingAdmin.”
Full URL to your Training Content Directory
The full URL to the root of all course content. Other directories are created under this directory during the Install to hold course material, notes, assignments, etc.
Disk Path to your Training Content
The full path to the root of all course content. Other directories will be created under this directory to hold course material, notes, assignments, etc.
Full URL to your Message Board
The full URL to the FlexTraining Message Board directory.
Full URL to your Chat Room
The full URL to the FlexTraining Chat Room directory.
IP Number of your Web Server
Enter the IP # for the web server on which you are running. Used for various internal System calls. Student Module will not run properly without a correct IP # entered here.
Run Code (based on Server IP Number)
Enter entire Run Code EXACTLY as issued for your specific software license. If you move FlexTraining to a new server, you MUST obtain a new Run Code.
Database Manager
Set to "MS Access" if using MS Access as your database. Set to "SQL Server" if using MS SQL Server as your database software. Impacts some internal formatting of database cells for date-related operations.
Time Zone Offset
Sets FlexTraining server to match student time, not server time, if applicable.
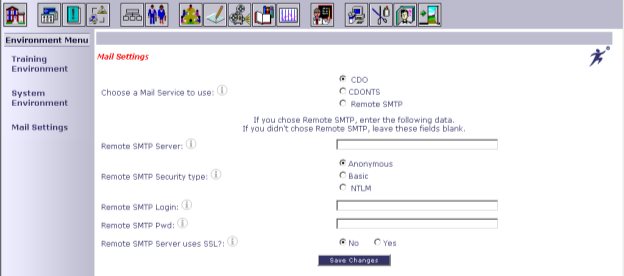
Mail Settings
Choose Mail Service
Select the Mail service that you would like to use with your FlexTraining Software. If you are using Windows 2003 Server, you must choose either CDO or Remote SMTP. If you are using Windows 2000 Server, you may choose any of the three options. CDO is the recommended choice.
Remote SMTP Server
Remote SMTP allows you to connect to your own privately run mail server located on a different system than the FlexTraining installation. Enter the web address of this external server here.
Remote Security Type
Security Type is the type of login access required to use the remote SMTP mail server. The three options are Anonymous, which is the least secure method of connection; Basic, which sends the password in clear-text format, and NTLM, which is an encrypted password format. You will need to use the format that is dictated by your Remote SMTP server’s configuration.
Remote SMTP Login
If you choose Basic or NTLM for the Security Type setting, you must specify a login name here.
Remote SMTP Password
If you choose Basic or NTLM for the Security Type setting, you must specify a password here.
Remote SMTP SSL
If your remote SMTP server requires the use of Secure Socket Layers, specify yes here.
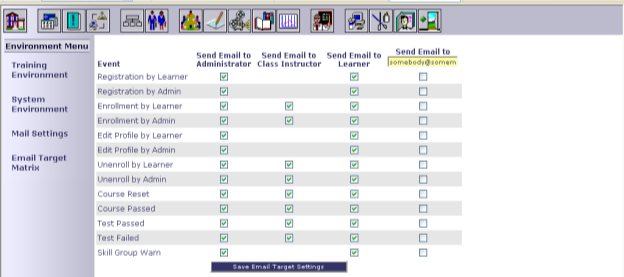
Email Target Matrix
Designates various online training events, such as registration, course completion and test results. Establishes email target settings for administrators, class instructors, students and other interested parties.
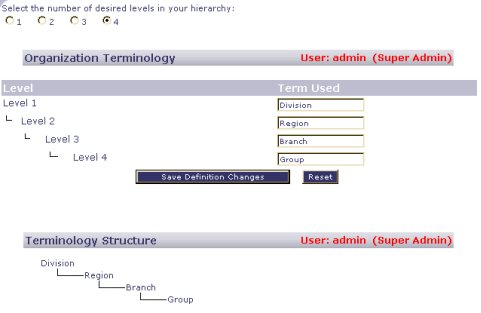
Organization/Hierarchy Menu
You may define your own unique organizational hierarchy where there are multiple levels of manager, authors, and other users of the management center. A hierarchy of 1-4 levels is used to determine what data each user can access.
There are a couple of one-time setup tasks you have to do. They include setting the number of levels in your management hierarchy, the names of each level and the entities within each level.
You may return to these sections at any time to add new values to a level or change the terminology used for each level. If you have any doubt as to what structure to choose, you should select a Flat structure.
If you wish to revert to a flat organization, click on the "Edit Structure" link in the Org Menu to the left.
Hierarchy & Terminology
To setup your hierarchy, use the “ Hierarchy & Terminology” item from the left-hand navigation.
The following screen will appear, allowing you to setup the hierarchy.
View/Edit Hierarchy
You may view or edit the existing hierarchy using the corresponding menu item.
Default Hierarchy Level for Self-Registration
You may set a default hierarchy level for all students that self register. This allows you to keep privately offered classes out of public view.
Edit Structure
This feature allows you to choose between a flat (regular) or hierarchy system.
![]() FlexTraining Version 5.2 Page 1
FlexTraining Version 5.2 Page 1